General Information
There are two models of the SP50, the regular and the compact. The regular model takes a 6 cell battery pack (3 over 3) and the compact takes a 3 cell battery.
The SP50 compact model only has 3 contacts on the side, whereas the regular model has all four (as shown on the programmer page). The top contact has been eliminated on the compact model, and the charger and programmer use the same contacts as the regular model.
The parts list shows that most of the parts are interchangeable between the two models, differences arise in the battery area to accommodate the larger (or smaller) battery.
The only tool required to take these radios apart is a prying tool like a flat screw driver.
Out of band programming
First, try using the shift key (as described on other pages) to enter the frequencies into the RSS. You may get lucky and not have to perform the procedure below.
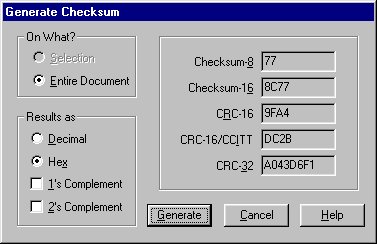
In the SP50.MDF file make a Checksum-16 of the whole file (the F12 option in Hex Workshop), in our case we ended up with 0x8C77 (RSS V 03.00), write this down, you might need it later.

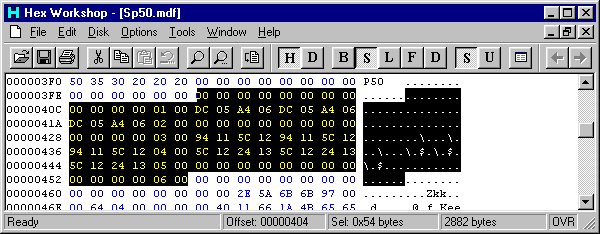
Look starting at about offset 0x404, you should see something like:

The highlighted area contains all the valid bandsplits that this particular RSS will recognize.
A single bandsplit entry looks like:

The bytes to take note of are:
05 00 = Bandsplit identifier (Note: the bandsplit identifier is at the end of the frequency list)
DC 05 = 1500 in decimal, ie 150.0000 MHz
A4 06 = 1700 in decimal, ie 170.0000 MHz
Note there are 3 occurances of the strings DC 05 and A4 06, the first set is the limits displayed in the Radio Wide menu (F4-F2). The second set are the TX limits for the radio. The third set are the RX limits for the radio (note that if the TX and RX limits are not set the same the RX limits are screwed up).
To figure out what hex to enter for your bandsplits you can either use the Base Convertor (in Hex Workshop), or use a calculator with a HEX --> DECIMAL conversion function.
If you are using a calculator enter your limit (ie 1360 for 136.000 MHz) and convert it to hex, you should get 0x0550. When you enter the data into the .mdf file you have to reverse the bits such that you would actually enter 0x5005 in the field you are changing.
If you are using Hex Workshop, launch the Base Converter utility and select "Intel Byte Order". Then, enter your desired frequency and write down the hex result.

You can then directly enter the hex result (0x5005) into the bandsplit field.

In this example we are changing the lower bandsplit of a 150-170MHz radio to 136-170MHz.
Save the new file (you might want to make a backup copy of the original if you haven't already.
Some of the RSS packages (we don't have codeplugs for everything, so we can't check them all) check the checksum of the .mdf file when you try and load a codeplug and return an error if the checksum of the .mdf file doesn't match the one stored in the program. Try running the RSS with the new .mdf file, if you don't get an error when you run the RSS and load a codeplug then you don't have to worry about the next step.
Correcting the .mdf File Checksum
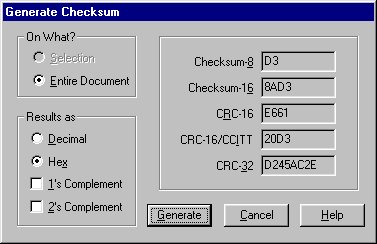
If you get a corrupt .mdf file error then you will have to go back and correct the checksum in your edited .mdf file. Load the file back in your hex editor and make a Checksum-16 of the file. If you compare the new checksum

with the original one

You will find they are probably different.
The only way we have to correct the checksum of the file at this time is to keep editing bits and making Checksum-16 calculations until the edited file's checksum and the original match. You can either edit the Copyright statement or some of the model descriptions in the file. Just take one or a few of these insignificant bytes (some experimentation may be required depending on by how much the cheksum is out) and add or subtract a few bits of the numbers make a Checksum-16 of the file. You should notice the checksum has changed by the number of bits you added or subtracted. Keep going until the checksum's match.
Once the checksum's of the files match you should be able to run the RSS, load the codeplug, and enter the frequencies within your new bandsplits with ease.
Expanding the number of channels in the SP50
Example for a P94YQT00A2 being converted to a P94YQT00G2:
Start with:

Note the highlighted bytes preceed the model you are trying to change.
Finish with:

This modified software will now read your 2 ch radio as a 10 ch or whatever other model swaps you have done. You will of course want to save this hacked software in a separate directory and use it only to read your 2/10 channel radio because if you now read a factory 10 channel radio the last 8 channels will magically disappear because it now thinks it is the 2 channel one!
All that is left to do is to stick on a 10 channel escutcheon and knob and you are ready to talk!
Also note the 0x04 at offset 0x57C, this is the bandsplit identifier for this model number and corresponds with the entry in the bandsplit table at the top of the .mdf file.

Oh, and if you need to program the radio... you might need this cable. :)